British Anzani Minor help needed

Talk about interesting old outboards which aren't Seagulls here

Moderators: John@sos, charlesp, Charles uk, RickUK, Petergalileo

User avatar
Nudge
Posts: 830
Joined: Sun Feb 15, 2015 2:43 am
Location: Auckland, New Zealand

Re: British Anzani Minor help needed

Post by Nudge »

I was finally able to get the brass screws undone to access the water pump. It's not much of an impeller but it seems to work very well.
The only reason I took it apart was to change the screws.

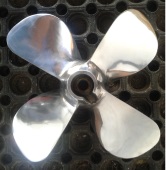
This is what I found!
Image

Both sides look the same.
Image

The other thing I did was clean up the mag base
Image
It could almost be mistaken for a new one..... But it is not!
Image

I think this engine will look quite nice all polished up!
"THE KING OF BLING"!
Is it better to over think, than not think at all?
User avatar
AusAnzani
Posts: 1002
Joined: Wed May 21, 2014 10:47 am
Location: Australia
Contact:

Re: British Anzani Minor help needed

Post by AusAnzani »

The gearbox and water-pump housing/impeller on your Minor appear to be the same as that which you would find on any Pilot. You will note the impeller sits on an offset (from centre) cam, so what you have there is a reciprocating water pump similar to that which appeared on many early water-cooled outboards.

The ignition plate and associated components are however different from those on an Anzani Pilot.

In my humble opinion, all Anzani's look their best when they are polished up so I for one am pleased to hear you're going that way.

Image

Image

Keep up the good work and the photos coming.

Regards,
www.vintageoutboardsaustralia.blogspot.com
User avatar
Nudge
Posts: 830
Joined: Sun Feb 15, 2015 2:43 am
Location: Auckland, New Zealand

Re: British Anzani Minor help needed

Post by Nudge »

Your engine looks real nice.
Looks like I may have to make a new nut to hold the prop on as well. Is your one made of aluminium? The nut I my engine is a crappy looking brass one.

Started to have a play with the buff
Started off with a poly pad style buff it make the aluminium look quote dull but takes the scratches out reasonably fast.
Image
then I changed to a cotton buff with some polishing soap for a look.
Image
There was quite a bit of sand drop in this casting, I not sure if I will be able to get all of the marks out... but I will give it a bit more of a go!
Image
"THE KING OF BLING"!
Is it better to over think, than not think at all?
User avatar
AusAnzani
Posts: 1002
Joined: Wed May 21, 2014 10:47 am
Location: Australia
Contact:

Re: British Anzani Minor help needed

Post by AusAnzani »

Looks like you've got the bug :lol:

Yeah, my prop nut is made of aluminium. I've got a couple other outboards (including Aussie made ones) with the same prop nut, so it would appear this was a purchased part and not something made by Anzani. Anyway, having seen some of the work you've already done, it wouldn't have thought it would be too difficult for you to turn one up on your lathe.

Re the polishing. You seem to have found an easier way than me to smooth out the aluminium, so thanks for that.

What you've done so far looks great. If you want to take that to a super bright finish all you need to do is hit is with 1000 wet and dry to remove the scratches and work up to 1600 before buffing it with the grey and then the white polish.

You won't get rid of those deeper indentations, but that's ok. These things weren't perfect back in the day.
www.vintageoutboardsaustralia.blogspot.com
User avatar
Nudge
Posts: 830
Joined: Sun Feb 15, 2015 2:43 am
Location: Auckland, New Zealand

Re: British Anzani Minor help needed

Post by Nudge »

Making A new prop nut wont be a problem at all!

I will crack out the 1000 + grits but first I would like to get the mixer sorted so I don't end up scratching the polished parts.
"THE KING OF BLING"!
Is it better to over think, than not think at all?
User avatar
Nudge
Posts: 830
Joined: Sun Feb 15, 2015 2:43 am
Location: Auckland, New Zealand

Re: British Anzani Minor help needed

Post by Nudge »

Well while I have been waiting of some pics of the mixer (still waiting) I got the coil sorted.

Image

I sent the mag base half way round the world and had one custom made. :)
It may not look like the orignal but it fits and works like a champ!
when the flywheel is on nobody will be able to see it.

While the coil was being sorted I polished the cowl and tank a little more. The flywhell polished up quite nicely too!

Image
"THE KING OF BLING"!
Is it better to over think, than not think at all?
User avatar
AusAnzani
Posts: 1002
Joined: Wed May 21, 2014 10:47 am
Location: Australia
Contact:

Re: British Anzani Minor help needed

Post by AusAnzani »

I don't recall ever seeing an Anzani Minor that looked so pretty 8)

How about a run down on how you did the polishing? I'm always looking for new (and preferably easier) ways to do things.

Regards,
www.vintageoutboardsaustralia.blogspot.com
User avatar
Nudge
Posts: 830
Joined: Sun Feb 15, 2015 2:43 am
Location: Auckland, New Zealand

Re: British Anzani Minor help needed

Post by Nudge »

Give me 5 and I will take some pics!

I start off with a grinder with a 3m Scotch bright. They come in differant "grits"
Image

For the bigger areas I change the buff on the polisher to a polypad type wheel, I think it is about 150~ 200 grit.
Image

My buff is a simple homemade thing, I used a spa pool motor (they have a thread onthe end of the shaft) bolter to a bit of ply. The tapered spindle came from Bunnings along with the polishing cotton buff and cutting soap.
Image

for the small tight areas I use a rotary tool with similler tools!
"THE KING OF BLING"!
Is it better to over think, than not think at all?
User avatar
AusAnzani
Posts: 1002
Joined: Wed May 21, 2014 10:47 am
Location: Australia
Contact:

Re: British Anzani Minor help needed

Post by AusAnzani »

Thanks for that.

I will give the Scotch Bright pads a go on my next resto.

Regards,
www.vintageoutboardsaustralia.blogspot.com
User avatar
Collector Inspector
Posts: 4182
Joined: Sun Jun 29, 2008 4:32 am
Location: Perth Western Australia
Contact:

Re: British Anzani Minor help needed

Post by Collector Inspector »

I have lifted from my RRRRRS and boxed up the Mk1 tank, air valve and manifold plumbing and posted to Chris today.

There are some sneaky up till now hidden things within.

I am sure that His skills will have all duplicated and documented in no time flat. Useful for everyone I am sure.

Earlier post shows a very shiny gearbox. Very shiny prop nut.

That is a later nut. I would say by the look of the castings...a "Sea Maid"

Below is a pic of an early nut (On the parts donor Mk1).

Chris, is this what you have on yours?

The nut is brass round with two flats. It has a lock pin.

The nail so obvious should be a length of brass rod bent at both ends. That is the shear device.

If you have the same nut Chris.....that is 2 out of 2 known examples aye. :shock:

20151103_132246.jpg
20151103_132225.jpg
And today was the Race That Stops a Nation so decent bubbly #1.
20151103_130157.jpg
B[/color]
A chicken is one egg's way of becoming others
User avatar
Nudge
Posts: 830
Joined: Sun Feb 15, 2015 2:43 am
Location: Auckland, New Zealand

Re: British Anzani Minor help needed

Post by Nudge »

your lower leg looks the same as mine only mine has a standard looking brass nut with a brass shear pin bent at the ends like you say.

I will post a pic later.

Thanks for putting the parts in the post.

It is a bit later!
Mine is in bits at the moment Im cleaning it up as fast as I can.
Image

Image

Image

Any idea what the thread is ment to be on the 3 brass screws that hold the water pump cover? the screws on mine are a bit sick

Chris
"THE KING OF BLING"!
Is it better to over think, than not think at all?
User avatar
Collector Inspector
Posts: 4182
Joined: Sun Jun 29, 2008 4:32 am
Location: Perth Western Australia
Contact:

Re: British Anzani Minor help needed

Post by Collector Inspector »

RRRR I be seeing a hex nut for shore.

That there Hex nut be as on others I have aye.

Old shipmate nuts to be shorrrrrrr.

Me thinking there be some casting marks not spied before by my eye....aye.

She Blows as below Davey Jones.

03112015039.jpg
They Be both the castings aye top and the under RRR.

B
[/color]
A chicken is one egg's way of becoming others
User avatar
Nudge
Posts: 830
Joined: Sun Feb 15, 2015 2:43 am
Location: Auckland, New Zealand

Re: British Anzani Minor help needed

Post by Nudge »

RRR yes my is the same as yours!
Image

there is little grub screws in the two casting lumps either side of LONDON. My guess is holding a bush for the drive shaft (I have not had that apart)
"THE KING OF BLING"!
Is it better to over think, than not think at all?
User avatar
Collector Inspector
Posts: 4182
Joined: Sun Jun 29, 2008 4:32 am
Location: Perth Western Australia
Contact:

Re: British Anzani Minor help needed

Post by Collector Inspector »

Avast!

I have explored in one of the sheds and took pics of some of my Mk2 Minors aye.

Advance retard casting is visible.

No "London" at all.

And low and be hold shipmates............a fancy prop nut ARrrr.

MK2 being red plate with mixer.

20151104_175352.jpg
20151104_175954.jpg
20151104_175312.jpg
20151104_175243.jpg
B[/color]
A chicken is one egg's way of becoming others
User avatar
Nudge
Posts: 830
Joined: Sun Feb 15, 2015 2:43 am
Location: Auckland, New Zealand

Re: British Anzani Minor help needed

Post by Nudge »

Interesting!
On my engine the casting has some grinder marks (probably where the casting was fed from) I wondering if the casting may have been broken at this point and that is where the leaver was attached?
That is also the same side the mixer is on!

Image

Only thing is it is on the opposite side to the pics you show. Is there any grinder marks on your mark 1 casting?
"THE KING OF BLING"!
Is it better to over think, than not think at all?
Post Reply