LS36688

You can talk about almost anything here

Moderators: John@sos, charlesp, Charles uk, RickUK, Petergalileo

headdownarseup
Posts: 2484
Joined: Thu Apr 04, 2013 2:26 pm
Location: bristol

LS36688

Post by headdownarseup »

Hi all.
I'm just starting my new project, another LS.

I just thought i'd start singing the praises of our Tasmanian brethren (A-J)
His "pattern" gaskets are truly SUPERB!
just the teeniest little bit of fettling to get them to fit but they're near as damn it spot on.

Well done A-J, i'm impressed.

If anyone else is thinking about refurbing a "little model 40", you could do no worse than check out some of these gaskets.
I'm sure he has a few spare. :P

Any how, the LS is none the worse for the normal wear and tear, the usual blocked up waterjacket, slightly stuck piston rings, the bore is in pretty good shape, gearbox internals covered in the usual gloopy mess, lots of chrome missing from the drive tube, slightly dinged exhaust tube, and very bashed up fuel tank (aren't they all! :roll: )
I'm just trial fitting everything together at the moment but it's looking promising.
Pics to follow shortly

jon
User avatar
Collector Inspector
Posts: 4182
Joined: Sun Jun 29, 2008 4:32 am
Location: Perth Western Australia
Contact:

Re: LS36688

Post by Collector Inspector »

Very cool and well done.......please remember that we like pics aye?

Fettle starts now.

B
A chicken is one egg's way of becoming others
headdownarseup
Posts: 2484
Joined: Thu Apr 04, 2013 2:26 pm
Location: bristol

Re: LS36688

Post by headdownarseup »

Here we go then!
after a couple of hours this afternoon spent twirling spanners and blow torches, i've ended up with a LOT of bits.
Some good, some not so good.
After an initial degrease and clean i can see what's left, mostly good but most of the shiney stuff has lost its shine and turned to rust!

Take a look
Attachments
SDC12102.JPG
SDC12103.JPG
drive shaft will need replacing-- rusted through
User avatar
Oyster 49
Posts: 3311
Joined: Tue Oct 26, 2010 6:55 pm
Location: Derbyshire, UK

Re: LS36688

Post by Oyster 49 »

Interesting to see you have a steel base and a copper head gasket there.
User avatar
Oyster 49
Posts: 3311
Joined: Tue Oct 26, 2010 6:55 pm
Location: Derbyshire, UK

Re: LS36688

Post by Oyster 49 »

Interesting to see you have a steel base and a copper head gasket there.
User avatar
Stelios_Rjk
Posts: 1458
Joined: Sun Jun 17, 2012 10:15 pm
Location: Athens - Greece

Re: LS36688

Post by Stelios_Rjk »

Also the studs are coated with something, maybe to protect them. Previous owner did some tricks possibly?
I love the 10600/145 turns!!!
User avatar
Collector Inspector
Posts: 4182
Joined: Sun Jun 29, 2008 4:32 am
Location: Perth Western Australia
Contact:

Re: LS36688

Post by Collector Inspector »

Good approach

May set a new standard for show and tell with an end result.

Yep

10/10

B
A chicken is one egg's way of becoming others
headdownarseup
Posts: 2484
Joined: Thu Apr 04, 2013 2:26 pm
Location: bristol

Re: LS36688

Post by headdownarseup »

I'll let you into a little secret here.
I actually took the powerhead apart over 2 months ago, so i knew it was going to come apart nice and easy. At that time the studs were quite rusty, so i decided to paint something over them to protect the metal until i was ready to start work on it properly.
The basic guts of the LS are there, just that some parts are really showing their age, namely the drive shaft. (A-J if you're reading this take note)

This is basically what i do to every motor i get hold of.Strip it right down to component form and carefully inspect EVERYTHING.
To ask an old engine like this to operate for a few hours or more without knowing any of it's "history" is just asking for trouble.
It might seem a bit over the top to some, but peace of mind speaks volumes.

So now i can see what i need to get replaced/refurbished (notice i didn't say the word RESTORE) This project will not be a restoration but a refurbishment. Things will become clearer later on.

Right then, so i need a replacement driveshaft,a new throttle cable,a new spark plug, a replacement ht lead (i dont like the look of the modern push fit connecters), cut a new gasket for the gearbox end cap,a new filler/drain plug, time will tell whether i need new piston rings or not. The magneto all works ok so that will just get a good clean up and polish, and maybe the odd nut and bolt here and there. (there's bound to be the odd one or two that get really chewed up)
Only 3 things missing from this pile of bits---------a transom mount, a fuel cap, and a tiler grip. I think everything else is there

The fuel tank on its own will take a couple of weeks to sort out (but i have a plan for that, not quite as invasive as removing an end from the tank)

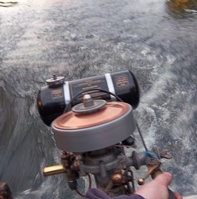
So the plan for today is to sort out the powerhead!
Starting with a good clean of all the studs and nuts.Then the part that will take the longest which is waiting for the paint to dry on the cylinder.
This will be the first thing to do while i sort out other bits like "lapping the joints" on the crankcases.

pics to follow :P

jon
User avatar
Collector Inspector
Posts: 4182
Joined: Sun Jun 29, 2008 4:32 am
Location: Perth Western Australia
Contact:

Re: LS36688

Post by Collector Inspector »

You Fibbed Dude.

B
A chicken is one egg's way of becoming others
headdownarseup
Posts: 2484
Joined: Thu Apr 04, 2013 2:26 pm
Location: bristol

Re: LS36688

Post by headdownarseup »

Perhaps some things are better left unsaid Bruce! :lol: (not all fibs....honest)

Are we sitting comfortably, then let's begin.

With various powertools i removed all the loose and flaking paint from the block and applied 2 thick coats of black enamel (probably needs a few more but looks ok for now)
While the paint was drying on the block i then cleaned up the crankshaft, the piston and rings, cylinder head and crankcases and carefully trimmed any excess metal from the gaskets.
I'v also "lapped" the taper on the top half of the crankshaft by rotating the flywheel several times with some valve grinding paste (woodruff key removed) so it will fit back together nice and snug.

If i can manage to get the pics in the right order it'll start to make sense!
Attachments
waterpipe fitting removed to check for any last bits of rust that might be in the waterjacket. the very bottom of the hole shows this
all the rust now removed and the threads cleaned up and re-tapped. (wish my camera was a bit better)
lots of the original silver finish left on this block (is it a plating of some sort?)
first coat of paint
first coat of paint
starting to look good
headdownarseup
Posts: 2484
Joined: Thu Apr 04, 2013 2:26 pm
Location: bristol

Re: LS36688

Post by headdownarseup »

some more pics taken today
Attachments
rings gudgeon pin and piston cleaned up and looking nice
good looking hepolite piston
pretty clean in here too
headdownarseup
Posts: 2484
Joined: Thu Apr 04, 2013 2:26 pm
Location: bristol

Re: LS36688

Post by headdownarseup »

a few more
Attachments
lapping the taper joint with fine grinding paste
a small smear is all you need,place the flywheel on the crank and spin by hand-- easy
starting to go back together
looks alright so far
headdownarseup
Posts: 2484
Joined: Thu Apr 04, 2013 2:26 pm
Location: bristol

Re: LS36688

Post by headdownarseup »

and a few more

Leave well alone for 24 hours to let the silicone cure enough before i remove the "snots"

There we are then, powerhead done!

What's next?

jon
Attachments
both halves have had the same treatment over a flat surface and fine wet and dry paper until all the high and low spots have gone.
bruce wont like me now for using silicone on the crankcases or cylinder
but at least it's back together in one piece.compression seems ok so far but time will tell
Adrian Dale
Posts: 758
Joined: Wed Apr 16, 2014 7:58 am
Location: Tasmania, Australia

Re: LS36688

Post by Adrian Dale »

looking good.. I still prefer a light coat of Stag past instead of the silicon.

One point I would make to anyone attempting this for the first time; take note of the piston reassembly and its direction in the photos. I recently got an engine that wouldn't start and found that the piston had been put in 180" out. Check out Jon's photos and you wont go wrong.

AJ
headdownarseup
Posts: 2484
Joined: Thu Apr 04, 2013 2:26 pm
Location: bristol

Re: LS36688

Post by headdownarseup »

Right then, let's take a look at that rusty drive shaft!

It's the age old problem of rust and how to stop it happening again (within reason)
You'll see that the shaft itself is getting pretty thin in places and has actually gone right through here and there?

2 problems here to deal with.
The first is how to remove the delicate cast aluminium impeller from the shaft.
The second is to find a replacement shaft. I've come up with a sort of hybrid solution to the problem which should be a bit more robust than the original.
The problem is with the wall thickness on the shaft themselves. The "little model 40" drive shafts (remember this is an LS i'm working on here) are ever so slightly smaller in wall thickness than the later models. The pics below will demonstrate this.

So, first things first, out with the blowtorch and remove the split pin that holds the impeller to the shaft. Next, heat the impeller (carefully and gently so as not to melt it) and VERY CAREFULLY tap it off the shaft. (this took me about 30 mins)
Now we're left with a small impeller and a big shaft which dont fit together. So, i carefully filed the internal flats of the impeller thus making the inside measurement slightly bigger.
Now what i've got is a nice thick sectioned shaft (which hopefully wont rust for a quite a while now) whilst still retaining some of it's original fittings.
I could have just fitted a later type plastic impeller to the replacement shaft but that's cheating.

jon
Attachments
split pin removed, impeller carefully removed and the full extent of the rust can be ssen
rusty, VERY RUSTY
rusty, VERY RUSTY
original LS shaft on the left, thicker replacement shaft on the right
hybrid shaft, should last for quite a while once it's had some paint over it.
Post Reply