Well I think it's essential to mention in the beginning of this post that if anyone try to remove the end of a tank with heat and there are fumes, fuel, sticky substance or remains of old fuel inside the tank it may go BANG and pieces of metal will fly to all directions.
For this reason I cure my tanks before removing an end in a strong solution of caustic soda to remove any trace of fuel. This way I believe it's safe to try but there is always a risk so unless you are 1000% sure you know what you are doing you could try this. (Don't want to kill anyone!)
Alright, sometimes I remove one end of a tank. When I try to put it back I use soldering wire but I have leaks. Could anyone help with the technique he uses? I have heard the sweating technique but it doesn't work good enough for me. I am wondering how British Seagull assemble the tanks? So neat job and whenever I try the result is at best at in the picture.
About the soldering wire and flux, do you use something special? This time I used a soldering rod (5x5mm) Pb-Sn and plumbers flux. The result is not bad but not as the original. Did British Seagull used a lead based wire or is it brazing?
Hello,
I never refurbished a brass tank but in general for soldering I use tin wire with a flux core inside, made for electronic printed circuits and the similar. I don't know the alloy. It can seem a waste of money in comparison with the usual plumber's rods but it is very good. I still have a good stock of it since I was using it for my job. Sorry we are too far away.
Of course a much bigger soldering iron is wanted than that for resistors and diodes. The parts must be very clean - sand paper and alcohol - and ideally they should have rather large surfaces adhering one another very close. This can be difficult on parts straightened by hammer.
Probably Seagull used some special substance rod, but I can't see anything to be ashamed of in the picture. It will be painted over and, as far as it is liquid tight and it will stay so after a life of vibration, it is OK to me.
If you take the tank apart, what does it look like? How much overlap is there between an end piece and the middle section?
I would probably use a propane torch to solder it back together, use S39 as flux, and pb-sn as solder. Pb-sn in 50-50 % is softer than 40-60. The 50-50 has a lower melting temperature too. Therefore I would go for the stronger solder.
Your soldering looks good in the picture.
Happy gulling,
Charan
SJP11446LL parts only, TC52234L unrestored, THC67581L unrestored, FP1986JJ4 running, GF2355EE7 running,TC63272 work in progress, AD52014 unrestored, sEEgull work in progress.
The Sweating technique is when you heat under the join and the the solder is sucked and stayed in the join.
The internal of a tank looks like this in the pictures. That end was badly deformed and with the heat cracked and loose some bits. In addition heat was too strong and you can see two point where the end has melted.
What? If you don't destroy something you're not going to learn. I fill the tank with some sand to keep the heat on the end I am removing but... Overheated and the brass melted.
Luckily enough there it two ends on the way so I will close it. I could repair this one also with a sheet of copper or brass from the inside but it would look as if it had been rescued from a battlefield so...
My problem is that I have a small torch for this job so creativity replace this luck.. not with successful every time
This tank was a good one for experiments. Too dented. On the point of the damage were the awful deformations. I saw that in case of too deformed ends it is quite possible to see cracks when attempting to remove it or afterwards when trying to cure it with a ball hammer.
The attempt with the round tank was successful though.
Nice work Stelios. It inspired me to try the same. A round tank from a 102, brass, badly dented. I have a propane torch, a nice sunny day, and enough time. However, I did not get the end off the tank. At the end of the day it was red hot but did not move an inch.
How do you remove the end from a tank? Is it soldered, or is there more to know about it?
thanks,
Charan
SJP11446LL parts only, TC52234L unrestored, THC67581L unrestored, FP1986JJ4 running, GF2355EE7 running,TC63272 work in progress, AD52014 unrestored, sEEgull work in progress.
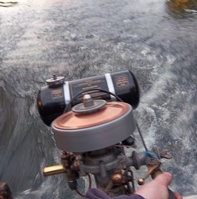
I don't know if this YouTube clip will be any help to you, perhaps it will inspire you to try again. A clamp, gravity, a propane torch, a screwdriver and a bin full of water appears to be all that is required. Thanks to HA for posting the clip. I've never tried it myself so I can't help with any other advice. I like the dents, they add character! Anyway I'm sure others who have had success previously with brass tank end removal will be along shortly with advice for you.
Red hot is not enough. You need lots of heat, I have used a 200,000 BTU torch to remove ends it still takes a few minutes to get hot enough, but it works well. Sorry, do not know the metric equivalent for BTU. The torch head is about 50mm in dia. where the flame exits, it produces a blue flame about 25-30 cm long.
Yes, heat and lots of it, as the joints are silver soldered. Also avoid trying to prise the ends off with a screwdriver, as the brass will be so soft that all this will do is chew up the flange of the end cap.
Heat it up and it will drop off when it is ready. H-A is spot on with his video as always!