sd 102 restoration. where do I start ?

Having problems with a Seagull? - ask an expert here

Moderators: John@sos, charlesp, Charles uk, RickUK, Petergalileo

Post Reply
User avatar
skyetoyman
Posts: 630
Joined: Sun Jan 10, 2010 11:48 am
Location: Glendale , Isle of Skye
Contact:

sd 102 restoration. where do I start ?

Post by skyetoyman »

Bought off fleabay almost 2 months ago. Finally arrived this week. In much better condition than expected. Compression and every that should move does.
Thinking of starting with the simpler stuff first ie Fuel tank ; transom bracket ; carb but what next ? brass exhaust , brass flywheel cover and clutch lever . (which looks long but is marked seagull) c1945 so I now have one as old as me
Last on a boat 20 years ago
IMG_1230.JPG (40.8 KiB) Viewed 1272 times
Looks a better option than my silver century plus which sits too deep in the water . How will it compare in pushing power.
LLS c 1961 on a crescent 42 boat c 1980 + wspcl c 1976 + 102 SD8561 c 1944 + 102 ACR 1948
Horsley-Anarak
Posts: 2838
Joined: Thu Aug 07, 2008 8:42 pm
Location: Surrey

Re: sd 102 restoration. where do I start ?

Post by Horsley-Anarak »

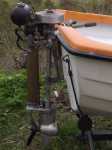
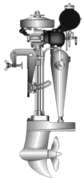
I would say that with an engine of that age you must strip it and examine all of the parts before you try to start if.
Does not take long.

First thing give it a good spray (so it is dripping) all over with WD 40, then leave it for a few days.
This will help you to undo every thing but it also softens up the dirt making it easier to clean.
Make sure rings are free.
Waterways are clear (hard with a 102).
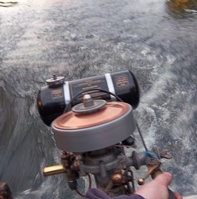
Crankcase is not full of crud.
Gearbox is not full of crud.
Carb is not full of crud.
Tank is not full of crud.
Main bearings are not worn out.
Measure resistance of coil ht winding.
Inspect water pump impellor.

That should get you going. :wink:

H-A
User avatar
Oyster 49
Posts: 3311
Joined: Tue Oct 26, 2010 6:55 pm
Location: Derbyshire, UK

Re: sd 102 restoration. where do I start ?

Post by Oyster 49 »

I think H-A has summed it up nicely 8)

I recorded my SD restoration on the "SD restoration" thread in the help section. It turned out to be a bit of a voyage of discovery, learning a lot about these wartime engines on the way.

They are museum pieces so I'd suggest just taking your time and having fun on the way. I now have another SD to do, next winters project and have accumulated a few spare parts on the way. Jan over in Holland is one of the most knowledgeable chaps about when it comes to SDs, and he can help with hard to find parts.

I saw your engine and noticed that clutch lever, any chance of a photo of it?

Best of luck with the restoration :D
User avatar
Charles uk
Posts: 4954
Joined: Wed Feb 27, 2008 4:38 pm
Location: Maidenhead Berks UK

Re: sd 102 restoration. where do I start ?

Post by Charles uk »

When faced with a unfamiliar engine straight from someone else's shed, the best first step might well be lots of pics from every angle.

Then I would wash it down with a 20:1 two-stroke mix & a 1" paint brush to remove all the dust, grime, grease & spiders, then a few more pics, especially showing the magneto base plate position in relation to a fixed point on the crankcase.

Remove petrol tank & carb, beware 1/4 BSF bolts break easily

Remove flywheel (John has puller tools for this flywheel) & magneto baseplate, often the baseplate fixing screw is a bastard to loosen, in this case I weld a 6" length of 1/4" bar to the end & use small pair of stilsons, sometimes heat is required, do not cook anything electrical.

Now remove powerhead from top of driveshaft tube by undoing the 2 x 5/16" nuts under crankcase, to undo these you will need a 5/16 BSF 85 degree obstruction spanner, if you don't have one get a 5/16 BSF open ended spanner cut & welded.
Remove exhaust tube, water delivery tube & water into exhaust tube, then remove cylinder, now inspect water jacket for any signs of cracks, normally found in bottom half of water jacket, it helps inspection if you can remove water inlet brass fitting next to exhaust port & the top water outlet elbow, check inside water jacket for build up of rust deposits, if not too bad often these can be removed with a bit of bent wire coat hanger & compressed air.
Just because air passes through the jacket don't assume it's clear, you can get a lot of air through a 1/16" hole, this is make or break time in your restoration decision!

The SD is a lovely Seagull with almost as much push as a century + but with a lot more character, well worth the extra effort, though it's not a motor I'd choose to run in salt water not when it's at least 65 years old!

Take lots of pics for us to see of all the stages it would be more informative for beginners to see all the steps.
Make it idiot proof and someone will make a better idiot.
User avatar
charlesp
Posts: 2567
Joined: Mon Mar 06, 2006 1:37 pm
Location: Poole, Dorset, England

Re: sd 102 restoration. where do I start ?

Post by charlesp »

Once stripped and checked you will need to think about what you're going to do with it. There are different schools of thought about this. The stationary engine people have started leaning towards a minimalist approach to restoration, where rust removal and necessary repairs are the order of the day, (They call this state 'In their working clothes'), whereas the American approach seems to be that everything must be polished or plated, authenticity is simply a hindrance to true beauty, and 'improvement' is seen as preferable to original finish.

My own preference is the minimal these days, but it's a personal thing
User avatar
skyetoyman
Posts: 630
Joined: Sun Jan 10, 2010 11:48 am
Location: Glendale , Isle of Skye
Contact:

Re: sd 102 restoration. where do I start ?

Post by skyetoyman »

clutch lever is marked "ULL & PATENT" but has grinding marks that may have removed "SEAG". It is 8 1/2" & 3". Fuel tank is steel and seems to be built like an oxygen tank
Thanks for all the advise . Luckily I do live in a museum -- sadly it's a toy museum. Not sure if HID will accept it as a boys toy.
I am not a believer in too polished either. Looks good on the back of the boat is enough for me.
IMG_1233.jpg
LLS c 1961 on a crescent 42 boat c 1980 + wspcl c 1976 + 102 SD8561 c 1944 + 102 ACR 1948
User avatar
woodbutchergraham
Posts: 329
Joined: Fri Feb 29, 2008 4:52 pm
Location: Grimsby

Re: sd 102 restoration. where do I start ?

Post by woodbutchergraham »

Forgive me friends I have polished most of the Brass and bronze parts on my SD. Having spent most of my life with my farther an ex steam marine engineer. His attention to detail of all things mechanical, border on the obsessive. With comments like “there is no back door out at sea” and “look after it like your life depends on it because it just might”. This has rubbed off on to me and the polishing is all part of it.
I don’t think all those engineers that work on traction engines and steam engines would ever agree that it’s an American idea to polish items. I haven’t gone overboard (pardon the pun) with the polish but I still prefer the looked after look.

Best of luck with your re-build on your SD Mr Toyman from sky. I hope this engine gets under the skin like it did with me I have to agree with HA and Charles UK take your time. If you struggle to remove a part leave it for a few more weeks in soak, Last year’s 10; 1 mix and diesel works well and cheaper than gallons of WD40. I have a contact that works in a hire car workshop and often drops off 25 gallon tins of diesel and petrol mix. He needs to get rid of it after draining tanks when customers put in the wrong fuel. If there is too much petrol I use this in the mower.
Attachments
IMG_20110601_151512.jpg
Life is what you make it, and what you make could change your life.
User avatar
Oyster 49
Posts: 3311
Joined: Tue Oct 26, 2010 6:55 pm
Location: Derbyshire, UK

Re: sd 102 restoration. where do I start ?

Post by Oyster 49 »

Looking very good Graham. How about some more close ups :D Show that engine off..

I took the line of cleaning the brass and copper up, with fine wet and dry and then a light polish. The gearbox was also cleaned up with wet and dry and also given a light polish. The flywheel got the same, but it did not shine up much. Looks nice though. I managed to reuse all the original crankcase and cylinder nuts, after a clean up with wire wool. Only paint used was heat resistant gloss on the cylinder and black spray enamel plus lacquer on the tank.

The bracket came wire brushed, but the shine will fade over time. Just the occasional dip to clean it up I expect.

These SDs really look good, I must say, but now it is done, it will be using it that will give the most pleasure, knowing that it is a piece of history.
User avatar
woodbutchergraham
Posts: 329
Joined: Fri Feb 29, 2008 4:52 pm
Location: Grimsby

Re: sd 102 restoration. where do I start ?

Post by woodbutchergraham »

I have to agree Adrian the restoration and regular use of these quirky little engines is what it’s all about. 8)
I will try my hardest to attend your SD meet August is a busy time for me so keep me in the loop. Personally I think Skytoymans gear leaver has been extended. This would also answer the grinding off of the Seag in Seagull.
Life is what you make it, and what you make could change your life.
User avatar
Collector Inspector
Posts: 4182
Joined: Sun Jun 29, 2008 4:32 am
Location: Perth Western Australia
Contact:

Re: sd 102 restoration. where do I start ?

Post by Collector Inspector »

SDs can be bloody fiddly, especially when you get a really corroded one that has the possibility of "Bits". Case in point with this one.

The flywheel washer would not move, even 6 months heating and soaking and the other subtle options. No washer off, no flywheel off so drilled hole just now 1/2 way thru washer (May use upside down later) so as to smack it around to thread off.

Worked!

Image

Image

Image

See what was underneath?

The answer is gently with these things so I have a great hat plate, pulley and nut so far. (Washer can be used again other side up).

Ignition is the goal with this.

I let Charles know what the engine number was a while ago SD9588L4 and now here is the ignition number...JM11772

Not much left thread for the puller to bite on but will get it off one way or the other................

Image

I have a power head from UK with no ignition plate so gently gently but sensible "Show No Mercy"

:twisted:

B
A chicken is one egg's way of becoming others
User avatar
Charles uk
Posts: 4954
Joined: Wed Feb 27, 2008 4:38 pm
Location: Maidenhead Berks UK

Re: sd 102 restoration. where do I start ?

Post by Charles uk »

With one of John's flywheel removal tools I removed a flywheel that had been standing in the garden for 15 years, the magnets had rusted themselves to the pickup laminations, a little heat just to expand the rim then off she popped.

I give them a few light clouts with a wooden drift in the "rope notches" it doesn't take long to start them rotating.
Make it idiot proof and someone will make a better idiot.
User avatar
skyetoyman
Posts: 630
Joined: Sun Jan 10, 2010 11:48 am
Location: Glendale , Isle of Skye
Contact:

Re: sd 102 restoration. where do I start ?

Post by skyetoyman »

Flywheel came off easily (with John's extractor) , cleaning up nicely , not got washer off yet , will spray with wd40. Do I paint or leave as polished ali.
Mounting brackets cleaned and working freely. Doing the simple stuff first as the museum is getting busy. Steel fuel tank next
IMG_1244.1.jpg
IMG_1243.1.jpg
LLS c 1961 on a crescent 42 boat c 1980 + wspcl c 1976 + 102 SD8561 c 1944 + 102 ACR 1948
User avatar
Oyster 49
Posts: 3311
Joined: Tue Oct 26, 2010 6:55 pm
Location: Derbyshire, UK

Re: sd 102 restoration. where do I start ?

Post by Oyster 49 »

Looking very good! I cleaned up the flywheel using fine wet and dry and water, followed by a good metal polish. It came up ok, but not a mirror finish. Looks just right i think. The copper magneto cover I firstly cleaned up with slightly worn scotchbrite wetted with metal polish, before the final polish. Again came up nicely, without looking too shiney. I did the same with the exhaust, thats when you get a real smile on your face :D

John at SOS can supply new flywheel washers, if yours is too corroded.
User avatar
charlesp
Posts: 2567
Joined: Mon Mar 06, 2006 1:37 pm
Location: Poole, Dorset, England

Re: sd 102 restoration. where do I start ?

Post by charlesp »

Looking good. SD flywheel were natural metal, no paint. Same with the other aluminium castings and the flywheel cover plate.

Debate continues as to the treatment of the cylinder block,some reckon it was zinc dipped and painted black, some say left zinc colour.

The drive shaft tube was zinc dipped, I have a theory that some very late SDs had a chromed tube, and maybe even a brass tank. I have two that arrived with brass tanks, that look the part with wear commensurate with the rest , but they may have been replacements.
User avatar
skyetoyman
Posts: 630
Joined: Sun Jan 10, 2010 11:48 am
Location: Glendale , Isle of Skye
Contact:

Re: sd 102 restoration. where do I start ?

Post by skyetoyman »

Steel Fuel Tank restored

from this
IMG_1228_1.jpg
IMG_1228_1.jpg (35.24 KiB) Viewed 1065 times
to this
IMG_0828.1.jpg
IMG_0829.1.jpg
Now comes the difficult part
LLS c 1961 on a crescent 42 boat c 1980 + wspcl c 1976 + 102 SD8561 c 1944 + 102 ACR 1948
Post Reply