B
I will make a new post with some more pics etc. about Saturday.
Looking forward to next meet, maybe my place or SG's?
Cheers
BP
My first Seagulls
Moderators: John@sos, RickUK, charlesp, Charles uk
-
AusOB_Collector

- Posts: 293
- Joined: Tue Apr 07, 2015 2:04 pm
- Location: Perth, Western Australia
- Contact:
Re: My first Seagulls
Too many Seagulls to count now!
Member SOS, AOMCI,
President of AOMCI's WOOC chapter
Member SOS, AOMCI,
President of AOMCI's WOOC chapter

Re: My first Seagulls
Don't forget about your buddies in the Eastern States.
www.vintageoutboardsaustralia.blogspot.com
-
AusOB_Collector
- Posts: 293
- Joined: Tue Apr 07, 2015 2:04 pm
- Location: Perth, Western Australia
- Contact:
Re: My first Seagulls
We haven't forgotten about our friends over there, next meet we have we'll Skype you! 
Cheers
BP
Cheers
BP
Too many Seagulls to count now!
Member SOS, AOMCI,
President of AOMCI's WOOC chapter
Member SOS, AOMCI,
President of AOMCI's WOOC chapter
Re: My first Seagulls
Skype may sort the audio and visual side of things, but I still won't be able to smell the 2-stroke.
Do you guys have smellevision over there yet
Do you guys have smellevision over there yet
www.vintageoutboardsaustralia.blogspot.com
-
AusOB_Collector
- Posts: 293
- Joined: Tue Apr 07, 2015 2:04 pm
- Location: Perth, Western Australia
- Contact:
Re: My first Seagulls
Hello all
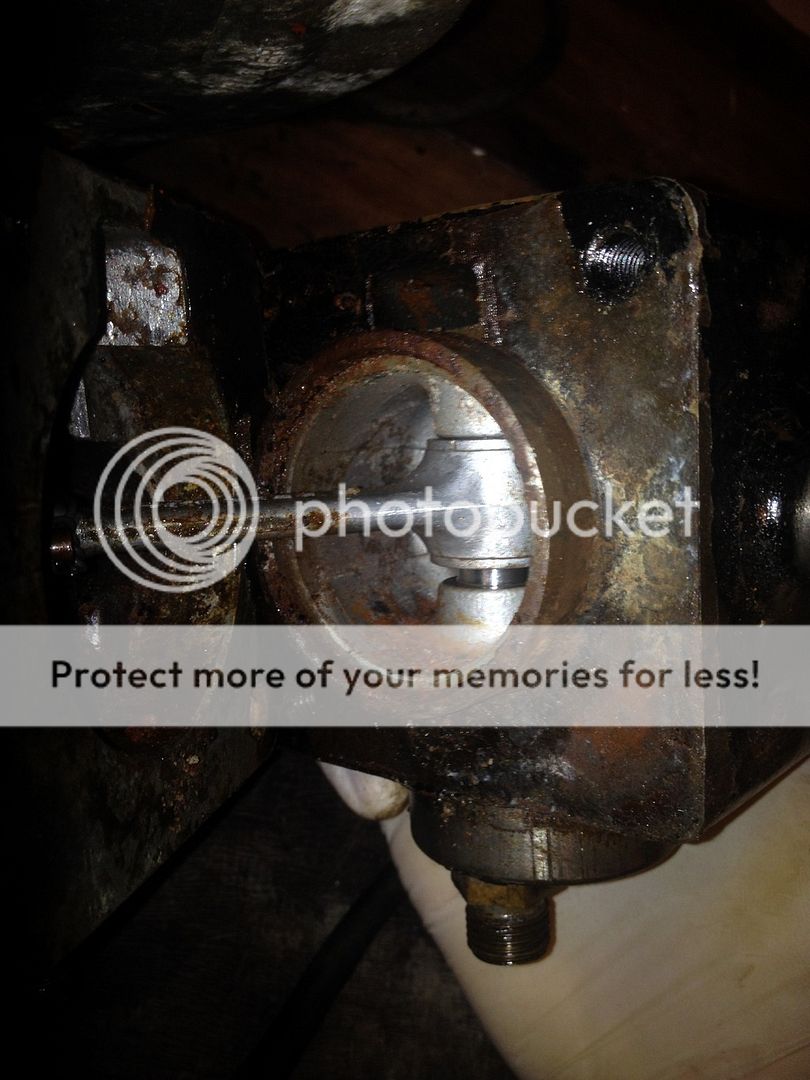
Back to work on my seagulls today. SJP654H5's powerhead is slowly coming apart, but after two weeks of trying various methods to get the seized piston out of the cylinder block my progress has come to a standstill. I have left soaking in diesel outside in a black plastic bag for a week - nothing. CRC etc isn't working either. Soon after I removed the head for the first time, a squirt of WD40 and some taps with a hammer on a wooden drift on the piano moved it back to just expose the exhaust port.
What methods do some of you use to free up Pistons?
Pics below.
Cheers
BP
Back to work on my seagulls today. SJP654H5's powerhead is slowly coming apart, but after two weeks of trying various methods to get the seized piston out of the cylinder block my progress has come to a standstill. I have left soaking in diesel outside in a black plastic bag for a week - nothing. CRC etc isn't working either. Soon after I removed the head for the first time, a squirt of WD40 and some taps with a hammer on a wooden drift on the piano moved it back to just expose the exhaust port.
What methods do some of you use to free up Pistons?
Pics below.

Cheers
BP
Too many Seagulls to count now!
Member SOS, AOMCI,
President of AOMCI's WOOC chapter
Member SOS, AOMCI,
President of AOMCI's WOOC chapter
-
Adrian Dale
- Posts: 758
- Joined: Wed Apr 16, 2014 7:58 am
- Location: Tasmania, Australia
Re: My first Seagulls
Heat and more heat on the block.
AJ
AJ
-
headdownarseup
- Posts: 2484
- Joined: Thu Apr 04, 2013 2:26 pm
- Location: bristol
Re: My first Seagulls
I made a press tool from some wooden dowel. The exact reverse of the piston crown and slightly smaller than the bore diameter.
I then heated the absolute @@@@ out of it with some oxy-acetylene and used the press to remove the piston. (almost fell out in the end, i reckon i could have pushed the dowel out by hand)
HEAT and plenty of it, but pay attention to the bore. As soon as you see the metal changing colour, stop heating and start pushing.
Worst case is you'll melt the piston, but no biggy as you can replace the piston later on once it's apart.
jon
( roundblock 102's i use a completely different method. Dissolve the piston with caustic soda )
-
Horsley-Anarak
- Posts: 2838
- Joined: Thu Aug 07, 2008 8:42 pm
- Location: Surrey
Re: My first Seagulls
Wow that could be interesting, have you distorted any cylinders yet Jon?headdownarseup wrote: I then heated the absolute @@@@ out of it with some oxy-acetylene and used the press to remove the piston. (almost fell out in the end, i reckon i could have pushed the dowel out by hand)
HEAT and plenty of it, but pay attention to the bore. As soon as you see the metal changing colour, stop heating and start pushing.
Worst case is you'll melt the piston, but no biggy as you can replace the piston later on once it's apart.
jon
I do use a bit of heat, but to warm a cylinder up to that degree is to me a little concerning.
Aluminium has a higher coefficients of linear thermal expansion than cast iron.
Heat can help, but I would hesitate to get the oxy out on a cast Iron cylinder, and using enough heat to melt out the piston,is in my mind foolish to say the least.
H-A
-
Adrian Dale
- Posts: 758
- Joined: Wed Apr 16, 2014 7:58 am
- Location: Tasmania, Australia
Re: My first Seagulls
I have repaired two cylinder water jackets by high temperature brazing. First heat the cylinder to around 200"C evenly then locally heat and braze. The cast iron wont distort and both cylinder are now in use. below is the detailed procedure:
Cylinder Head crack repair.
The century head was damaged when a stud was removed, replaced and over tensioned. When after checking out a water leak and head blow it was evident that the head had been seriously damaged.
On investigation it was seen that the cracks radiated from the threaded hole. Clearly in that condition new studs could not be fitted nor could the head be correctly tensioned.
I decided to experiment on a repair.
The photos show part of this procedure
First the stud hole was cleaned and tapped to allow a 5/16 stud to be inserted. The thread was grooved to allow a .5mm cut down the side of the thread.
The stud was cut flush with the cylinder head.
The ends of the cracks were identified with dypen and the termination points drilled with a 1mm drill
Surface cracks were dressed to a depth of 1mm
We were now ready to braze.
The head was preheated to approximately +200’C
When stable the area to be brazed was raised to the point where the rod would melt and run freely. This area was heavily fluxed and the heat maintained to ensure even temperature.
The brazing rod flows easily through cracks and down and around the threads; lightly tapping the cast iron also helps to induce the braze to penetrate the very pours of the iron.
On completion hold the temperature and allow to very slowly relax and cool
Result; a repaired head. Fettle, file and finally lap the head surface to ensure it is totally flat
Couple of the progress shots wouldn't load but you get the idea. The light reflection shos the braze up as Silver so not clear. but the braze penetrated all around and through the cracks. After the slow cool there was absolutely no distortion. The trick is slow pre-heat then very slowly cool down. I built a small brick surround (hearth) to hold the heat. cool down took 8 hours.
AJ
- Attachments
-
-
-
-
-
headdownarseup
- Posts: 2484
- Joined: Thu Apr 04, 2013 2:26 pm
- Location: bristol
Re: My first Seagulls
Nice repair there.
Similar requirements when the piston is stuck fast in the bore. If after everything else hasn't budged the stuck piston, the method i used was to dismantle as much of the powerhead as you can i'e crankcases and cylinder head, leaving the crank, rod and piston where there are.
Then slowly apply some heat. I spent about an hour or so bringing the temperature up on the outside of the block staying well away from the aluminium parts inside. (spare piston on standby just in case)
Then using the press tool i made placed on the top of the piston i then used a press to push out the stuck piston. Worked a treat.Almost fell out!
Then slowly start to reduce the heat so as not to distort the cast iron (again about an hour or so)
I still have that motor now. An LS and it runs really nice now. Still managed to salvage the original piston too without any ill effects.
It can be done, just take your time with it and don't be in a rush.
jon
-
AusOB_Collector
- Posts: 293
- Joined: Tue Apr 07, 2015 2:04 pm
- Location: Perth, Western Australia
- Contact:
Re: My first Seagulls
Hello all
Well, what a busy week this has been. We decided to go up to Kalbarri (WA) for a quick one week break and it just so happened that the villas we are staying at have some little dinghy a that can be used (without outboards); so I decided to try and get one of mine going well to take down with us. I didn't want to take an external fuel tank as that takes up too much space, so I was going to take my 1964 3hp Evinrude lightwin, but it was being quite stubborn and didn't want to run . Some of you may have been following the thread I started about that on AOMCI forum. Anyway, a day before we left it became apparent that it wouldn't be able to come with us so I quickly chose the seagull to come. Managed to heat the gearbox to get the pinion turning with a gas stove, but what was really surprising was as we used the drive tube, gearbox and transom bracket of SJP654H5's engine and the powerhead off SJP22051, all the parts that are usually a pain in the behind to get out on SJP654H5 came out with no heat or lubrication AND it had been at the bottom of the river for a while as well.
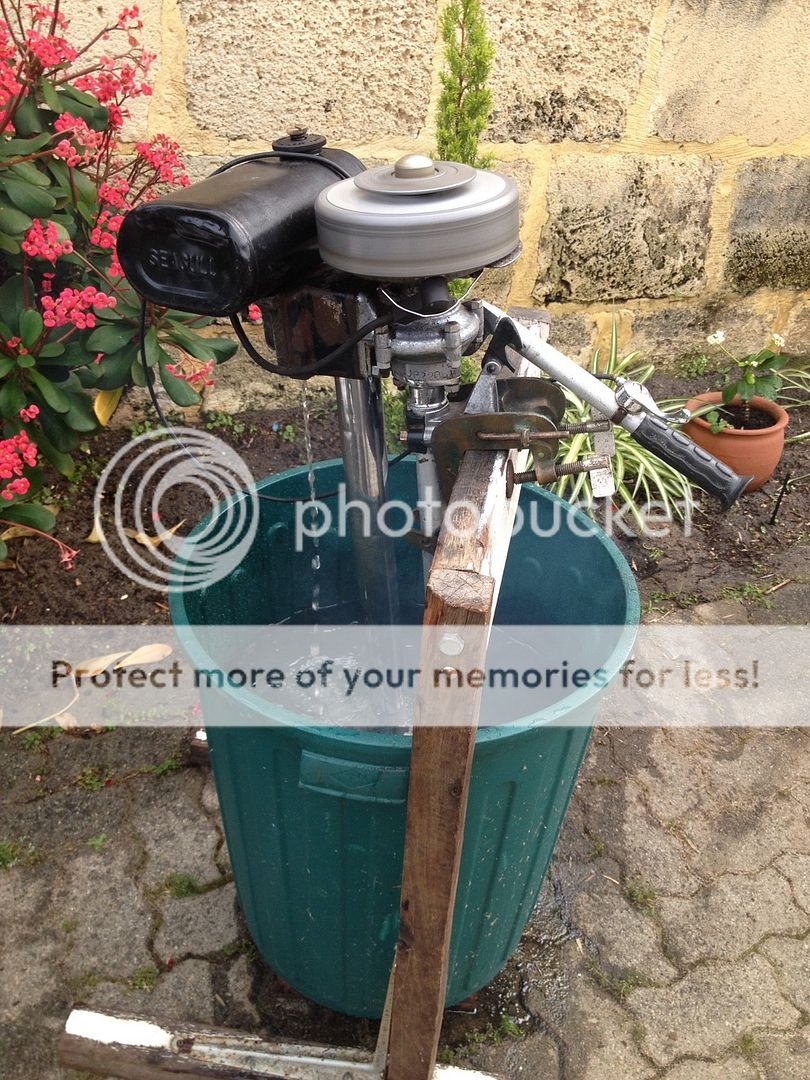
Cleaned fuel tank, rechecked compression And spark and then she started second pull! Over the moon with that. She also pumped a good steady stream of water in the test tub without the prop on so she should be good on the boat for a bit of fishing.
Will post some more pics when I get the chance.
Cheers
BP
Well, what a busy week this has been. We decided to go up to Kalbarri (WA) for a quick one week break and it just so happened that the villas we are staying at have some little dinghy a that can be used (without outboards); so I decided to try and get one of mine going well to take down with us. I didn't want to take an external fuel tank as that takes up too much space, so I was going to take my 1964 3hp Evinrude lightwin, but it was being quite stubborn and didn't want to run
Cleaned fuel tank, rechecked compression And spark and then she started second pull! Over the moon with that. She also pumped a good steady stream of water in the test tub without the prop on so she should be good on the boat for a bit of fishing.
Will post some more pics when I get the chance.

Cheers
BP
Too many Seagulls to count now!
Member SOS, AOMCI,
President of AOMCI's WOOC chapter
Member SOS, AOMCI,
President of AOMCI's WOOC chapter
-
headdownarseup
- Posts: 2484
- Joined: Thu Apr 04, 2013 2:26 pm
- Location: bristol
Re: My first Seagulls
Way to go... 
Just me being picky now. The throttle cable is far too long. (a bit saggy!)
Always good to see another old dear brought back to life.
How's the other one doing?
You'll soon be a pro at this
Keep going
jon
Just me being picky now. The throttle cable is far too long. (a bit saggy!)
Always good to see another old dear brought back to life.
How's the other one doing?
You'll soon be a pro at this
Keep going
jon
-
AusOB_Collector
- Posts: 293
- Joined: Tue Apr 07, 2015 2:04 pm
- Location: Perth, Western Australia
- Contact:
Re: My first Seagulls
Jon
I totally agree, the throttle cable is way too long, but that's how it was when I got them and I didn't have enough time to change the length back to the correct specs.
She isn't very smoky for a 10/1 and runs quite nicely up and down kalbarri's estuary so I'm happy!
Cheers
BP
I totally agree, the throttle cable is way too long, but that's how it was when I got them and I didn't have enough time to change the length back to the correct specs.
She isn't very smoky for a 10/1 and runs quite nicely up and down kalbarri's estuary so I'm happy!
Cheers
BP
Too many Seagulls to count now!
Member SOS, AOMCI,
President of AOMCI's WOOC chapter
Member SOS, AOMCI,
President of AOMCI's WOOC chapter
-
AusOB_Collector
- Posts: 293
- Joined: Tue Apr 07, 2015 2:04 pm
- Location: Perth, Western Australia
- Contact:
Re: My first Seagulls
Thanks Spiro,
I am very happy with it.
Went out this morning, 5 hrs cruising up and down the estuary. Got stuck a couple of times so had to get out and push.
I made a quick video on my phone this morning and have uploaded it to youtube, so if any of you would like to watch it - https://m.youtube.com/watch?v=Aa9lst_TGWE
Anyway, fingers crossed she's good for tomorrow.
Cheers
BP
Too many Seagulls to count now!
Member SOS, AOMCI,
President of AOMCI's WOOC chapter
Member SOS, AOMCI,
President of AOMCI's WOOC chapter