
Reading an article on John's site about removing dents from brass tanks. This is of intrest to me because I have just aquired a nice little forty plus with some dents in the tank. The article says the chap doing the repairs cut the ends of the tank, then with the aid of a brass strip re-solders them back together. The ends my forty plus tank look like two brass caps, is it not possible to un-solder them off instead of cutting them off? Maybe they are silver soldered which would make things more of a challenge.
Bearing in mind that even an empty tank is potentially explosive, has anyone ever tried this? veiws from the experts would be appreciated.
Simon
Brass Tanks
Moderators: John@sos, RickUK, charlesp, Charles uk

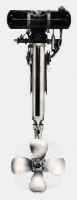
Tanks probably occupy more thought time than all the other components of an old Seagull put together. The smallest dent looks unsightly, and the temptation to put it right is as strong as the desire to remove a dent in one's much loved motor car.
Yes they were silver soldered, and as you're probably aware there is more than one variety of silver solder.
The stuff they used at British Seagull melts at rather a high temperature (I have a small strip of the original stuff, but haven't tried, but an acquaintance who used to work there has told me that you need lots and lots of heat). I haven't managed to unsolder an end cap yet; I use a medium nozzle on a propane torch. A bigger nozzle is next to try, but Machine Mart have none at the moment.
You are of course perfectly correct about empty tanks and explosions. It's a very dangerous thing, and exploding brass tank, so it's best avoided.
It isn't good enough to just empty the tank, after all it's the vapour that forms an explosive mixture with air, not liquid petrol. So you have to go further than that. A thorough wash and rinse of the tank with fresh petrol , preferably with an agitating agent such as fish tank gravel, will after a couple of goes if you're lucky, remove the oily contents. I follow that with boiling water with a dose of Fairy Liquid or similar detergent, and I do that 2 or three times.
I have been known to stick a suitably scalded tank (filler facing down) in the top rack of the dishwasher, but new(ish) primary woman has indicated that this (for some strange unfathomed feminine reason) is somehow unacceptable.
After that treatment you should be considerably safer, but when you approach the tank with a neked flame do it cautiously, preferably wearing something protective.
If you do manage to unstick the end caps, please let us know. I think we'd all be intersted, as so many of us have grieved over our less than perfect tanks. Once done, you can gingerly remove the dents. At this stage the brass probably won't need annealing after all that heat, so the actual work should be relatively easy.
Sticking the caps back on (as they used to say in the Haynes Manuals) is the reverse of the above, but I would be tempted to clean up the mating surfaces and use a softer solder that melts easier. Structurally I'm sure there would be no problem provided only a perfectly clean piece of work - bit of a challenge but it's important. It's vital that the tank doesn't leak afterwards.
If you can't get the ends off you could try loading the dents (after suitable scrupulous cleaning) with lead, or at least plumbers' solder. This can be used to fill dents and leave a softer excess which can be carefully shaped back to the correct contour. May not be perfect, but a big improvement. Soft solder takes paint, and won't flake after an impct like plastic filler.
Suitable primer and paint can then be applied, others will have their favourite brands, but the most important thing to remember is that you have to use something that won't dissolve in petrol.
John is in a position to supply an extremely good replica of the 'Sailorman' transfer and the printed instructions that go with it. This is indistinguishable from the original, or at least it is to my eyes, and the completed tank will look magnificent. I think it's best to say that any other decals you may see offered are probably not going to be as good, John has gone to great lengths to get his right.
Again I'll leave it to others to recommend their favourite brands of waterproof lacquer/varnish - we don't want the sailorman jumping ship.
A properly restored tank - and there are not many around - is a joy to behold and I wish you luck. Please let us know how you get on.
I'd be remiss if I didn't offer a couple more observations:
First, it may be much less effort to look round for a tank that isn't damaged. They are around, although no numerous.
Secondly, a new tank has the effect of casting the rest of the motor in a poor light. That gleaming black gloss may just lead you on a never ending quest!
Good luck
It may also be worth mentioning an alternative method discussed at length between the other Charles and myself, although (like so many things) not attempted; it falls into a growing 'Manana' category.
If we consider the classic oval tank, it's the ends that are usually damaged, and the central portion tends to remain unscathed. If only we could 'get behind' the offending ding in order to press or beat it out, then all would be well, and it's that end that we have in mind when we think about taking the ends off.
If instead of that we gain access to the inside face, we may achieve the same goal.
So why not cut a generous hole on the underside of the tank, on the flat area? If we do that we can introduce tools to the inner face, and the straightening can proceed.
A hole on the underside may be repaired with a flat piece of brass. As it's largely hidden a simple plate soft soldered over the offending hole - with a suitable overlap - would make the tank whole once more. If the edges were 'joggled' to provide a step on which the plate can rest then so much the better.
Any thoughts?
It’s certainly possible in theory,I used to cut the bottoms out of vintage motorcycle tanks to remove dents,holding a suitably shaped dolly on the inside whilst striking with a panel beating hammer from the outside,then welding the removed pieces back into place.
The Seagull tank has it’s own particular problems.
Firstly,it is small,I could not get my hand inside one,let alone whilst holding a dolly.
Secondly,the round brass L shaped bars that form the threaded mounting points underneath and then exit at the rear as the two pegs for resting the motor on when horizontal,you would have to negotiate your way around these somehow.
If the embossing is dented I doubt that it would be possible from inside.
In order to cut a big enough aperture to permit proper access you would probably have to cut a section out of the bottom that would be the full length of the tank.I reckon that removing the ends would be easier in the long run.
I have tried making dollies mounted on rods bent to shape but as you can’t see or feel where it is you might end up creating more dents.
Once you’ve got the ends off even the embossing can be vastly improved if you make a small punch with ends rounded to the inner profile of the lettering,then gently tapping as you work your way around the letters,it must be suitably supported from underneath of course,it is a slow process!
Any other ideas out there?
Brass Tanks
Thanks to all parties for all your advice. Seems to have stirred up a hornets nest. If there was an easy way of removing dents I suppose it would be on John's site. Still I'm always up for a challenge!
Working with silver solder is something I have had some if little experience. My recollection is that in order for it to work yo have to get the pieces cherry red for the solder to flow. The problem I can see is that in order to heat the tank up to remove the end cap, the whole end cap would have to be heated equally for all the solder to melt. A problem that would not be present when soldering it back on.
The other question is how much heat can be applied to brass without doing permenant damage?
I suggested to the wife regarding cleaning the tank in the dishwasher. She suggested to me that if I fancy starting 2008 with my testicles, I should find a differeny way. Or somthing along those lines.
Will not be trying it untill the new year, will keep you posted.
Simon
There are several types of silver solder,the melting temperatures range from about 600 degrees C up to about 800 depending on the composition.I doubt if anyone knows the type used by Seagull but I suspect it is the higher temperature variety.The other problem is that silver solder needs a flux to promote capillarity (to help it flow into the joint) so I wonder if the process can be reversed.It just does’nt flow without a flux,just stays as a blob of molten metal
I have managed to dismantle the silver soldered joints on 102 cooling pipes but all my attempts with tanks have failed.
The melting temperature of brass is around 950 degrees C but the amounts of copper and zinc used in the alloy can vary this I think.
On thewhole I think it’s much safer to dismantle by cutting through the joint but if you do succeed please let us know.
By the way,you may find it easier to remove dents if you anneal the brass,heat it then rapidly quench in cold water.
Good luck.
Steve
There are several types of silver solder,the melting temperatures range from about 600 degrees C up to about 800 depending on the composition.I doubt if anyone knows the type used by Seagull but I suspect it is the higher temperature variety.The other problem is that silver solder needs a flux to promote capillarity (to help it flow into the joint) so I wonder if the process can be reversed.It just does’nt flow without a flux,just stays as a blob of molten metal
I have managed to dismantle the silver soldered joints on 102 cooling pipes but all my attempts with tanks have failed.
The melting temperature of brass is around 950 degrees C but the amounts of copper and zinc used in the alloy can vary this I think.
On the whole I think it’s much safer to dismantle by cutting through the joint but if you do succeed please let us know.
By the way,you may find it easier to remove dents if you anneal the brass,heat it then rapidly quench in cold water.
Good luck.
Steve
Brass Tanks
Cheers Steve, certainly sounds tricky. Hopefully going to get hold of a forty+ which is not in running order (seized) and the tank on this is well mashed. Will be great to have a practice on, with nothing to lose. Getting heat on it from all sides would be the key.
Just been re-assembling my silver century plus after a major overhaul, going back together a bit easier then it came apart!
Cheers for now Simon
Just been re-assembling my silver century plus after a major overhaul, going back together a bit easier then it came apart!
Cheers for now Simon